Last Update: October 23, 2019
This documentation applies to version 0.5 and prior.
For more detailed informations about the current version 0.6 see the external manual.
1. Program Usage
Generating Curves without Preparations
M2C can be used without any preparations. Just drop map files onto the exe and it will try to generate a curved version of it IF your map meets the necessary requirements!
The results will be basic then. You can always change some settings in the Defaults.txt though.
Setting up Curves directly in a Goldsource Editor
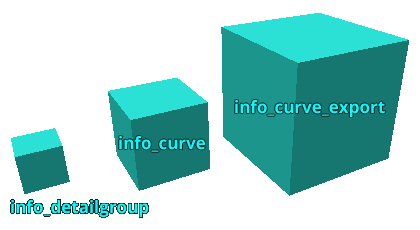
As of version 0.5 you can use special point entities info_curve, info_curve_export and info_detailobject) to setup your curves right inside a Goldsource editor (Hammer, Sledge, JACK).
Creating Preset Files for Curve Generation
To keep all settings in one file for repeated usage it is possible to create preset files for M2C.
Specify WAD Files for proper Texture Align
To achieve perfect results in terms of texture alignment you will need to specify your used WAD files in the WADList.txt inside the WAD folder.
Valid File Types
Valid files for M2C are Goldsource map files and M2C preset files, which are simple text files that contain valid commands and settings.
MyPresetFile.txt A M2C preset file!
MyMapFile.map A Goldsource map file!
How the Filetype influences the Generation Process
Using Preset Files
Using a preset file will always make M2C use the settings from that preset file, that is if it contains any settings. It will use these settings on the map file, that matches the name of the preset file, IF it exists.
MyPresetFile.txt + M2C.exe =
1. M2C looking for MyPresetFile.map to generate a curve from the preset file settings IF those are valid and IF map file exists.
2. Else: Looking for Defaults.txt file DEFAULTS.txt to obtain settings.
3. Else: Using internal defaults for settings.
Using Map Files
When giving M2C map files to chew on, it will scan it for internal information from curve entities (info_curve) and then for an external preset file.
If no info_curve or preset file was found, then M2C will use default settings from either Defaults.txt or its own internal ones.
MyMapFile.map + M2C.exe =
1. Looking for info_curve entity in map file to obtain settings.
2. Else: Looking for preset file MyMapFile.txt to obtain settings.
3. Else: Looking for Defaults.txt file DEFAULTS.txt to obtain settings.
4. Else: Using internal defaults for settings.
Multiple Files Handling
M2C can process multiple files in a row. The files can be of a different type (map or txt).
MyMapFile#1.map MyMapFile#2.map MyPresetFile#1.txt
2. Preset Files
At the moment curves can be generated by either dropping a map file or a previously created preset file (that has the same name as the mapfile) onto the program executable.
Which one you use to start the generation process makes a difference!
2.1. Creating Preset files
Name Convention for Preset Files
Per default MyMapFile.txt is linked to MyMapFile.map
A preset file needs to have the same name as the input map file for M2C to know which belongs to which. This can be overridden by using the “source” command and specifying an alternative input map file path.
Overriding source map
Now MyMapFile.txt is linked to MyCustomSourceMap.map
Specifying Curves in a Preset File
As there can be multiple curve objects defined in a preset file, M2C needs to know how many actual curve objects shall be created. The rad command that controls the curves radius is the indicator for that. Without any rad command in a preset file, the minimum amount of generated curves is 1.
rad 512 // Curve #2 is being defined with a custom radius of 512 game units
rad 0 // Curve #3 is being defined with its original position
Preset File Structure
Commands and their settings can be anywhere in a preset file. No special placement is necessary. As long as they are not commented out, they will be recognized as such.
As the preset file gets scanned for valid commands, their position of appearance defines to which curve object they belong.
Example #1 – Grouped
rad 512
type 0
offset 64
res 16
// these settings belong to curve object #2
rad 1024
type 1
offset -128
res 24
Example #2 – Stacked
rad 1024 // curve object #2
type 0 // curve object #1
type 1 // curve object #2
offset 64 // etc…
offset -128
res 16
res 24
Setting inheritance
Most settings of a curve object are being inherited by the following curve objects unless overwritten with another value.
If multiple curve objects were defined in a preset file and all of them are meant to share a certain setting, that setting only needs to be defined once.
The following curve objects then share the settings of the first one, use default values or automatically generate a value from previous values (only works for “res”).
Some commands don’t use this behaviour (e.g. Radius, Offset and Transformation commands).
rad 256
rad 1024
rad 2000
type 1 // All of the 4 curve objects share the curve type “1”
Comments
Any other text than commands and respective values has to be commented out -> “// Comment”
//offset 64 // this setting is going to be ignored
2.1.1. Examples
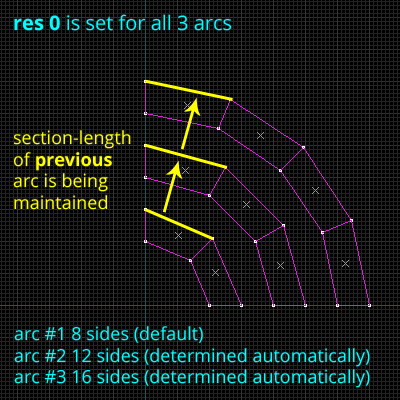
Preset File #1
rad 0 // Arc #2
range_end 25 // Both arcs will only output 25% (90 degree) of their total length.
offset 0
offset 256 // Arc #2 will be 256 units wider than #1
res 24 // Arc #1 will have 24 sides
res 0 // Arc #2 will maintain the level of detail of the first Arc.
type 0 // Both arcs will use the “Pi” method for their construction
2.2. Command List
Input Output File Settings
| Command | Type | Value Range | Default Value | Description |
| source | string | “UNSET” | Custom input map file path (Info). Example: C:\MyMaps\MySourceMap.map absolute “C:\My Map Folder\MySourceMap.map” absolute with spaces |
|
| target | string | “UNSET” | Custom output map file path (Info). Example: C:\MyMaps\MyTargetMap.map absolute |
|
| append | bool | 0/1 | 0 | Whether or not a generated curve gets appended onto an existing mapfile (Info). 0 : OFF – Overwrites target map completely. 1 : ON – Includes generated map into existing target map. |
| obj | bool | 0/1 | 0 | Exports individual arcs as OBJ files (Info). 0 : OFF 1 : ON |
General Curve Settings
| Command | Type | Value Range | Default Value | Description |
| rad | float | >0 | 0 | This specifies the arcs radius and is at the same time the “representative” for this arc. Each rad command stands for one arc, that is to be generated (Info). 0 : original radius (y-coord) >0 : custom arc radius in game units |
| offset | float | +/-0 | 0 | Additional offset on top of radius in game units (Info). |
| res | integer | 4-384 | 8 | Number of curve sides (Info). 0 : Maintains “level of detail” from previous curve object. |
| type | integer | 0-2 | 0 | Construction type for the generated objects (Info). 0 : Pi Circle 1 : Grid Circle 2 : Path from path file (TBD) |
| shift | integer | 0-5 | 5 | Horizontal texture shift mode (Info). 0 : Nullshift 1 : Per Section 2 : Per Brush 3 : Per Brush Texture 4 : Aligned Left(Section) 5 : Per Group Texture |
| height | float | +0 | 0 | Adds custom height to each section if greater than zero (Info). >0 : Custom height is being added to each section. |
| ramp | integer | 0-2 | 0 | Creates a ramp if height command is greater than zero (Info). 0 : OFF 1 : Linear Ramp Mode 2 : Smooth Ramp Mode |
| ramptex | bool | 0/1 | 0 | Controls the method for texture alignment on ramps (Info). 0 : Sheared 1 : Square |
| round | bool | 0/1 | 0 | Rounds all coordinates to integer numbers (Info). 0 : OFF 1 : ON |
| tri | bool | 0/1 | 0 | Activates triangulation (Info). Triangulation for for curve brushes. Brushes which don’t match the criteria will be assumed complex and triangulated less efficient (Info). 0 : OFF 1 : ON |
| range_start | float | 0-100 | 0 | The lower limit of curve sections to export in percent (Info). |
| range_end | float | 0-100 | 100 | The upper limit of curve sections to export in percent (Info). |
| bounds | bool | 0/1 | 0 | Enables or disables a brush box that covers the generated objects, for an easier handling in a map editor (Info). 0 : OFF 1 : ON – Creates a bounding box for the entire generated curve object. |
Advanced Curve Settings
| Command | Type | Value Range | Default Value | Description |
| spike_height | Integer | >0 | 4 | Default height for spike shaped brushes that occour when triangulating complex brushes (Info). |
| nulltex | String | NULL | Default texture for faces that occour when triangulating brushes (Info). | |
| skipnull | bool | 0/1 | 0 | Brushes that only consist of NULL faces are being skipped during export (Info). 0 : OFF 1 : ON |
| gaps | bool | 0/1 | 0 | Gap brushes are middle sections that can be used for various mapping purposes (Info). 0 : OFF 1 : ON |
| gaplen | float | >0 | 256 | Controls the length of gap brushes (Info). |
| transit_tri | bool | 0/1 | 0 | Triangulates the first and last brush of a curve object. When combined with transit_round the resulting curve can be connected to another curve a lot easier or be modifed in another way (Info). 0 : OFF 1 : ON |
| transit_round | bool | 0/1 | 0 | Rounds the coordinates of the first and last face vertices of a curve object so the resulting brushes can be connected to other brushwork easier. Is usually being used along with transit_tri (Info). 0 : OFF 1 : ON |
Spline Extrusion
Read more about spline extrusion here.
| Command | Type | Value Range | Default Value | Description |
| path | string | “UNSET” | Custom path to a file that has adequat information (e.g. path_corner) in it (Info). Example: C:\MyMaps\MyCornerMap.map absolute “C:\My Maps\MyCornerMap.map” absolute with spaces |
|
| p_reverse | bool | 0/1 | 0 | Reverses direction of a path (Info). |
| p_cornerfix | bool | 0/1 | 0 | Fixes overlapping corners of a path extrusion object (Info). |
| p_split | bool | 0/1 | 0 | Whether or not path objects are being split into smaller pieces on export (Info). |
Transformations
Read more about transformations here.
| Command | Type | Value Range | Default Value | Description |
| scale | Float | +/-0 | 0 | Scaling for the final generated curve object. Won’t affect point entities and currently only works for all axes at once! |
| scale_src | Float | +/-0 | 0 | Scaling for the source map. Won’t affect point entities and currently only works for all axes at once! |
| rot | Float | +/-0 | “0 0 0” | Rotation for the final generated curve object. Axis order is XYZ. |
| rot_src | Float | +/-0 | “0 0 0” | Rotation for the source map. Axis order is XYZ. Currently doesn’t work as intended for detail objects when rotated around axes other than X! |
| move | Float | +/-0 | “0 0 0” | Transition for the final generated curve object. |
Detail Objects
Read more about detail objects here.
| Command | Data Type | Default Val | Range | Description |
|---|---|---|---|---|
| General settings | ||||
| d_enable | Integer | 1 | 0/1 | Turns this Detail Group on or off entirely. |
| d_pos | Float | 0 | 0-1 | Controls the relative position of this DG along the curve section. |
| d_autopitch | Integer | 1 | 0/1 | Turns automatic Y axis rotation (Pitch) on or off. |
| d_autoyaw | Integer | 1 | 0/1 | Turns automatic Z axis rotation (Yaw) on or off. |
| d_autoname | Integer | 0 | 0/1 | Turns automatic numbering of target and targetname keyvalues on or off. |
| d_separate | Integer | 0 | 0/1 | Turns individual export of solid entities (brushes) on or off. |
| Randomize Y/X-Position and Z-Rotation | ||||
| d_movey_rand | Int/Float | 0 -32 32 | 0/1 min max | Moves objects along Y axis randomly within range. |
| d_rotz_rand | Int/Float | 0 180 -180 | 0/1 min max | Turn objects around Z axis (Yaw) randomly within range. |
| d_pos_rand | Int/Float | 0 0 1 | 0/1 min max | Randomizes position of objects along section within range. |
| Control/Randomize Export | ||||
| d_draw | Integer | 0 | x>0 | Export every x-th element of this group. |
| d_skip | Integer | 0 | x>0 | Skip export of every x-th element of this group. |
| d_draw_rand | Integer | 0 | 0/1 | Completely randomize the export of this groups elements. |
3. Map Files
3.1. Brushes
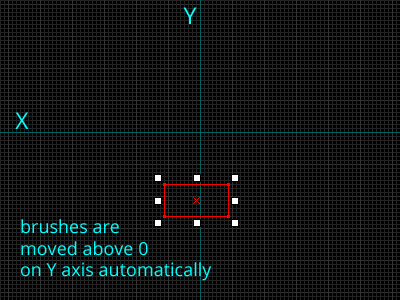
- Brushwork has to be horizontally aligned along the X-axis and can be anywhere on the map, but should be on the top side of the Y-axis. If some vertices of the map-brushes are below 0 on the Y axis, the source object will always be moved above 0 on the Y-axis for arc generation.
- Cutting Edges have to be planar.
- Slopes along the X-axis will lead to an invalid brush.
- Texture Rotations other than 0, 90, 180, 270, etc. will be automatically aligned to “World”.
- There can be Solid Entities and World Brushes in a Map file.
- Point Entities are being ignored.
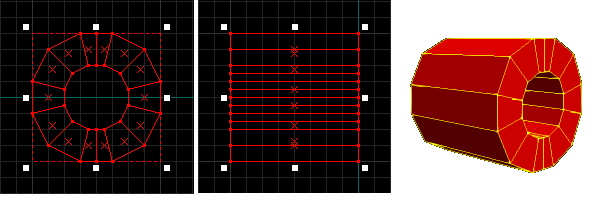
3.1.1. Brush Mesh Criteria
Mesh criteria for arc generation:
- No sloped faces along the X-axis.
- Planar cutting edge faces.


Valid brush lengths:
Brushes can have any length on the X-axis.
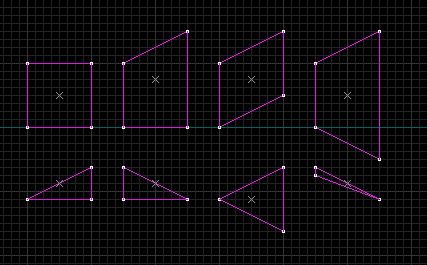
Some valid brush profiles:
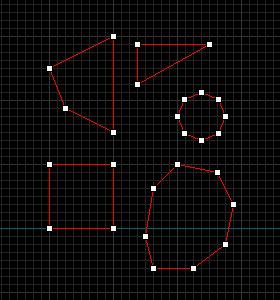
Valid brush profiles for Triangulation:
See section about triangulation.
3.1.2. Brush Positions
Position rules:
Brushes can be anywhere on the map, but will be moved above 0 on the Y-axis before arc generation.


3.2. Texture Rotations/Alignments
Texture-Criteria:
- On body faces (all faces along X-axis) only the texture rotations/alignments: 0,90,180 and 270.
- Cutting edge faces can have any rotation/alignment.
- Each face can have any Scale and Shift.


3.3. Solid Entities
Solid entities are being supported by Map2Curve. It is advised to turn anything into a solid entity (e.g. func_detail or func_wall) for a better brush-handling in the editor.
3.4. Point Entities
Point entities are supported and can be modified along with solid entities as Detail Object Groups.
4. Features
4.1. Generating Arcs
4.1.1. rad & offset
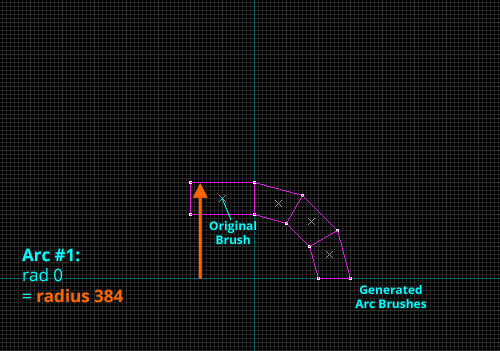
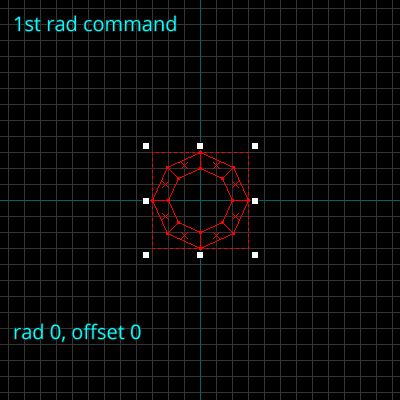
- “rad 0” will use the original mesh position from the map file, as long as it is above 0. Otherwise, it is moved above 0 on the Y-axis before the arc is being generated.
- Each radius (rad) command in a Map2Curve preset file corresponds to one arc.
- A preset file can consists of only one rad command. Anything else will be filled with default values by the program.
- Each arc defined in a preset file will always use the same base mesh from the loaded map file.
4.1.3. res
- Resolutions for PI Circles are always divisible by 4. Everything else will be rounded by the program.
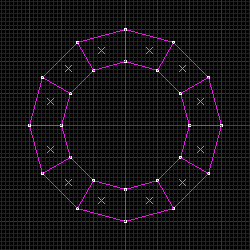
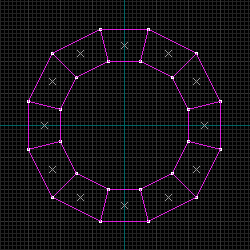
At the moment the minimum resolution is 4. - Resolutions for GRID Circles must be 12, 24, 48, 96, 192 or 384 or the appropiate ID: 1(12)…6(384)


4.1.4. type
Currently there are 3 ways the program generates curves: Pi- and Grid-circles and simple spline extrusion. Each one has its up- and downsides.
Curve Type Properties
| Type | Res ID | Minimum Sides |
Maximum Sides |
Default Sides |
Section Length |
Precision of Coordinates |
|---|---|---|---|---|---|---|
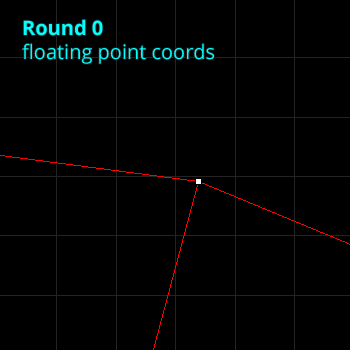
| Pi Circle | 0 | 4 | 384 | 8 | equal | floating point |
| Grid Circle | 1 | 12 | 384 | 12 | varies | integer floating point |
| Simple Spline Extrusion | 2 | Properties depend on input spline… | ||||
Pi circle properties
This uses pi to generate the contruction circles. This method will let you “arc” non-rectangular brushes (e.g. pipes), without the need of using triangles.
Upsides:
- Even length of each section
- Perfect circle
Downsides:
- The resulting floating point coordinates are not easy to work with (but can be compiled flawlessly in most cases and can be rounded to integer numbers)
Grid circle properties
This uses a special construction method:
A basic circle with 12 sides and a radius of 128 units is being rotated by 15 degrees, then scaled up to the next major gridline (gridsize is 32). Its vertices are then being snapped to the closest grid crossing. By doing this, the resulting arc brushes will be planar and might even have integer coordinates, which can be handled a lot easier than floating point coordinates of course. One condition for this is a small resolution and/or large grid sizes.

Upsides:
- The coordinates can be integer and are thus very comfortable to work with.
- Cutting edges are easier to work with.
Downsides:
- When arcing smaller brushes at high resolutions floating point coordinates (e.g. 0.5, 0.25, 0.125, 0.0625, etc.) are possible and can’t be rounded to integer numbers that easily without deforming the mesh and making this type of construction pointless.
- Not a perfect circle, rather oval.
- Sections don’t share the same length.
Simple spline properties
See the section about spline extrusion.
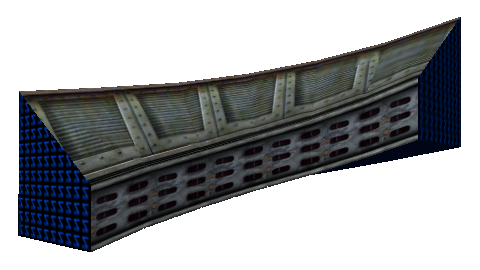
4.1.5. round
- The original generated vertice coordinates have floating point precision and are thus off grid.
- “Round 1” rounds these coordinates to integer numbers, which can be handled easier in an Editor because they are on grid.
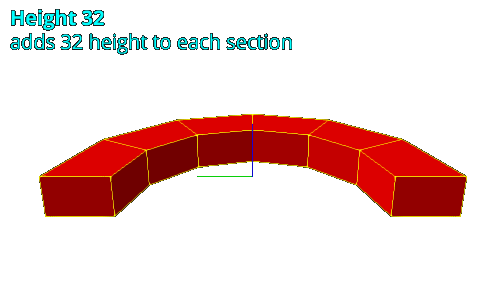
4.1.6. height
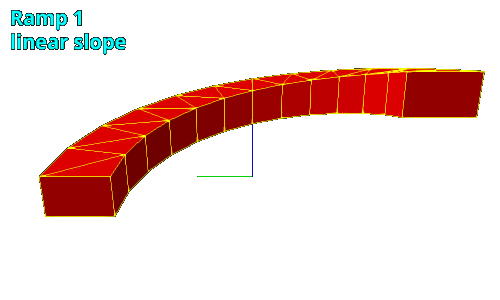
4.2. Generating Ramps
Ramps are created by combining the commands height and ramp.
HEADS UP: Round vertices of sloped triangulated brushwork in case of compilation errors!
When transforming certain brushwork into ramps, it might be a good idea to round the vertices to integer numbers, since the compiler tools really don’t like sloped brushes with floating point coordinates, that are furthermore triangulated. They will probably completely mess them up, resulting in holes and other unlovely errors.
Snapping everything to grid will avoid this in some situations. Maybe not always though, didn’t test it.
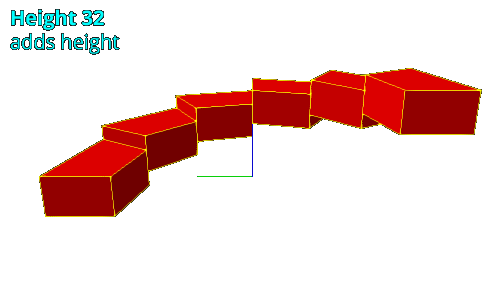
- While height adds a custom height (32) to each section…
- …tri 1 splits up the brushes into wedges, which is crucial for the sloped brushes to be loaded flawlessly by a Goldsource map editor.
- ramp 1, in the end, creates the actual ramp, with a linear slope. Ramp 2 would create a smooth slope.
Ramp (Slope) Mode
- ramp 1 creates a linear slope.
- ramp 2 creates a smooth slope.
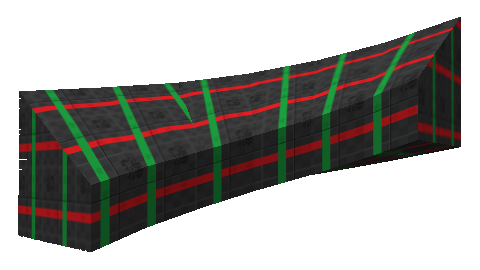
4.2.1. ramptex
The ramp texture mode defines how textures are being aligned on ramp surfaces, which is not an easy situation for aligning textures in general.
The easiest way to do this is to project the textures onto the ramp from above. This way there will be a certain distortion, but the original shift is being preserved perfectly. You can observe this by using UV Lock in JACK editor.
Ramp Tex Mode
- ramptex 0 Textures are being projected onto the ramps surfaces from an upright angle.
- ramptex 1 Textures are being aligned rectangular on the ramps surfaces. Currently there is no horizontal texture shift available for this mode.
Demonstration of both modes
4.3. Triangulation
- Using Triangulation on an Arc is crucial for ramp generation! As of version 0.2a it is being applied automatically though.
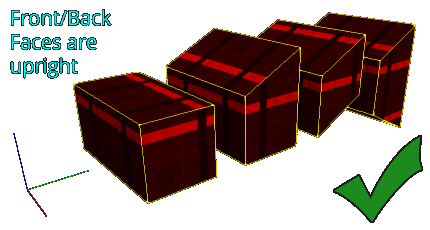
- Triangulation will currently only work on brushes that have 5 or 6 faces (wedges and squares) and an upright front and/or back face!
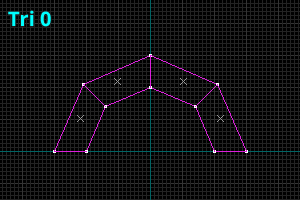
Valid Brushes
4.4. Texture Shifts
Map2Curve reads texture information from imported brush faces and uses them to calculate the new generated textures, aka rotate them, re-scale them and move them horizontally along the respective brush/arc edges.
In Order to do this, source textures need to meet certain criteria in terms of texture rotations/alignments.
There are several ways textures can be arranged on the generated arc brushes horizontally:
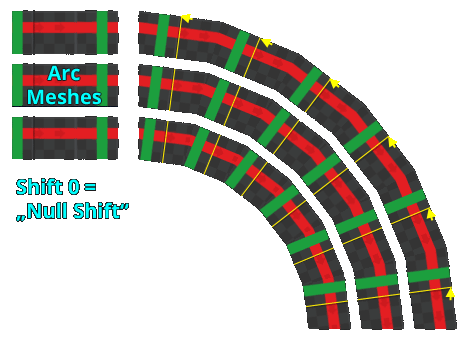
- Shift 0 [Null] – Simply puts all horizontal texture shifts to “0”.
- Shift 1 [Per Section] – All faces of a section share the same shift that is based on the longest edge length of that section.
- Shift 2 [Per Brush] – All faces of a brush share the same shift that is based on the longest edge length of that brush.
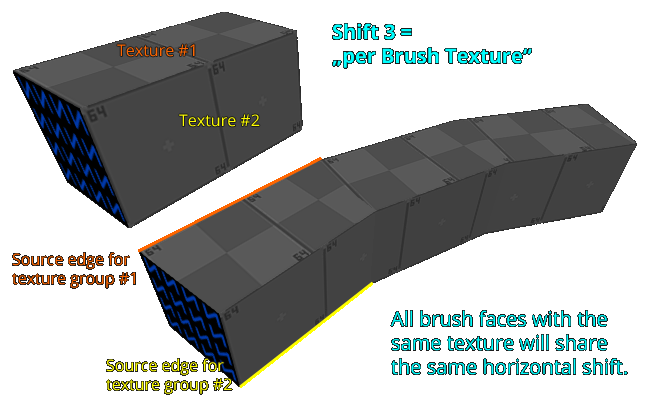
- Shift 3 [Per Brush Texture] – All faces of a brush, that share the same texture, will have the same shift, based on the longest edge length of that brush-texture.
- Shift 4 [Align Left] – All faces of a section are aligned to the left corner of this section.
- Shift 5 [Align Per Group Texture] – All faces of a solid entity group, that share the same texture, will have the same shift, based on the longest edge length of that group-texture.
4.5. Exporting as OBJ
OBJ is a 3D model exchange format. It can be imported and/or viewed in potentially any available 3D software.
Exporting a generated arc or ramp to OBJ can have multiple reasons and benefits. You might want to use it as reference when animating scenes in an external 3D software, other than a classic Goldsource editor.


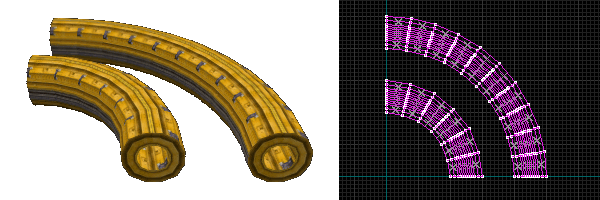
4.6. Spline Extrusion
As of version 0.3 Map2Curve can extrude brushes along a spline, that for example is made of path_corners and was created with a path tool such as the one in Hammer Editor. Since JACKs path editing tool is a lot easier to use, I can recommend it for this purpose.
Requirements for spline extrusion
- To extrude something along a custom spline you have to use “type 2” for this curve object.
- The spline needs to be put in a separate file, that has the same name as the file, that contains the source brushes, but with a “_path1.map” added to it, where “1” specifies the ID of the curve object.
- The path also needs to be made of path_corner entities and must be created with a path tool.
- The direction in which the path is heading is relevant for the later brush align and can be reversed with “p_reverse 1”.
- The offset command can be used on splines, too. It might break the mesh though, if being used with too high numbers.
- Circular splines are not yet supported. If you want to create a circular extrusion from a spline, you need to connect the last section yourself AND add one additional section, to create a correct loop.
Extrusion method explained
Currently there is only one method for the spline extrusion feature. It is a rather simple method, that produces clean brushes, while still offering a good optical quality without the need of triangulation.
It is based on the align of the spline sections. The source brushes cut faces are being rotated relevant to the spline section align (left, right, up, down). Empty corners are simply being filled then, to create an uninterrupted extrusion.
Downsides
Of course there are downsides to this method. It won’t create the best result in every situation. I have included a few settings that might help reduce these issues eventually.
Also it is not suited to extrude brushes, that need to have correct proportions to look authentic. This especially applies to anything that is man-made, while natural structures will still look good or at least okay.
Examples for natural looking spline extrusions


4.6.1. p_cornerfix
Autofilling corners doesn’t always work. More precisely it will only be applied, when the spline turns clockwise. There will be overlapping brushes at some point and mostly this won’t be a big deal. If necessary, “p_cornerfix 1” can be used to resolve this, but it should be kept in mind, that the resulting mesh will differ from the original spline then.


4.6.2. p_reverse
Sometimes it can be very useful to reverse the splines direction. This might already resolve a faulty extrusion. The source brush object might need to be flipped as well, to accomplish the result that was originally intended.


4.6.3. p_split
This controls whether or not the spline is being exported as a whole or gets split up into many smaller pieces, depending on the orientation of the respective segment. This can be very helpful on long splines.


Note: For this to work at all, the source brush needs to be a solid entity. Otherwise only separate world brushes are being exported.